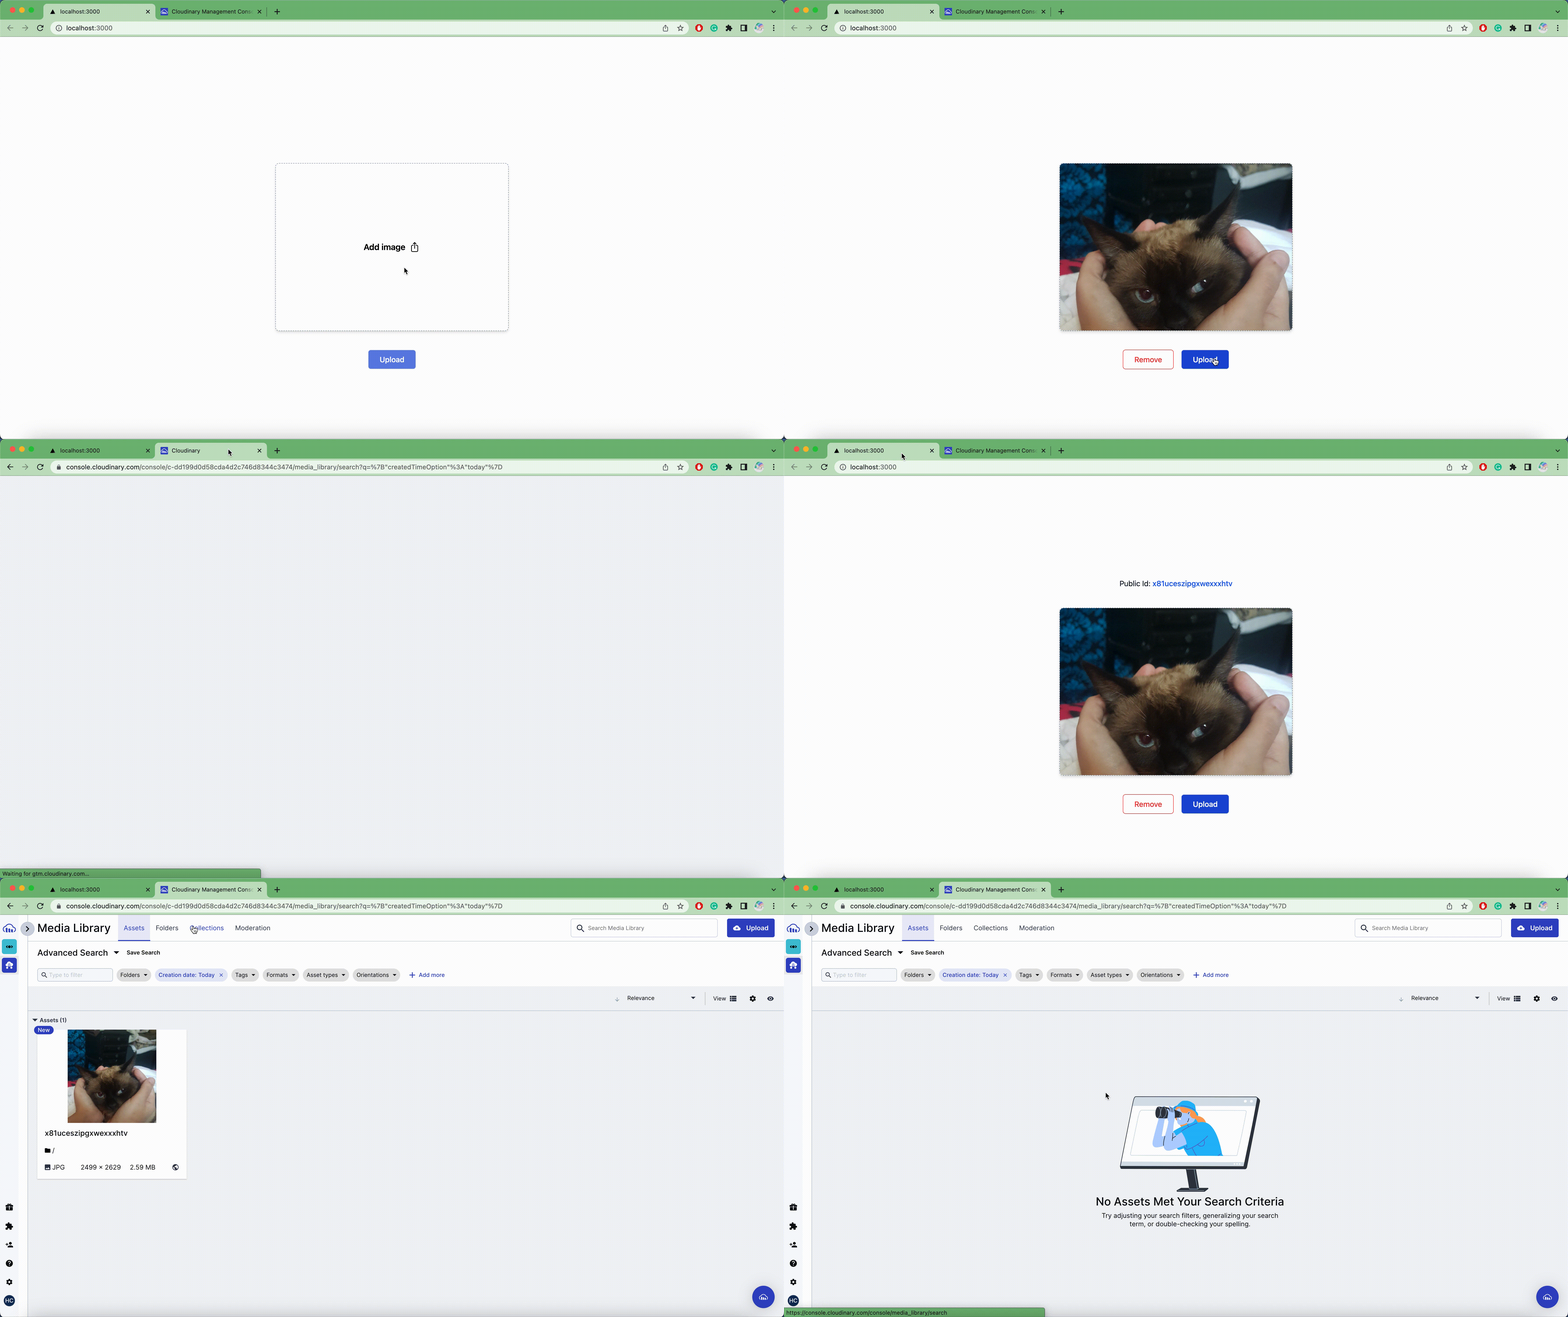
Cloudinary in NextJs - upload & delete images
Cloudinary is a powerful image and video management platform that provides developers with a range of features to easily upload, store, manipulate, and deliver images and videos from the cloud. In this blog post, we'll walk through how to use Cloudinary in a Next.js application to upload and delete images.

Getting Started
Before we get started, make sure you have a Cloudinary account and have created an API key and secret. If you haven't done so already, you can sign up for a free account at https://cloudinary.com/signup.
We'll also be using Axios. You can install Axios by running the following command in your terminal:
npm install axios
or
yarn add axios
Uploading Images to Cloudinary
To upload images to Cloudinary, we'll create a simple form that allows users to select an image file and upload it to Cloudinary using the Cloudinary API.
First, let's create a form component in our Next.js application:
import { useState } from 'react';
import axios from 'axios';

const UploadForm = () => {
  const [file, setFile] = useState(null);
  const [filename, setFilename] = useState('');

  const handleFileChange = (event) => {
    setFile(event.target.files[0]);
    setFilename(event.target.files[0].name);
  };

  const handleSubmit = async (event) => {
    event.preventDefault();

    const formData = new FormData();
    formData.append('file', file);
    formData.append('upload_preset','YOUR_UPLOAD_PRESET_NAME');

    try {
      const response = await axios.post(
        'https://api.cloudinary.com/v1_1/your_cloud_name/image/upload',
        formData
      );
      console.log(response);
    } catch (error) {
      console.error(error);
    }
  };

  return (
    <form onSubmit={handleSubmit}>
      <div>
        <input  onChange={handleFileChange} />
        <label>{filename}</label>
      </div>
      <button type="submit">Upload</button>
    </form>
  );
};

export default UploadForm;
In this form component, we're using useState to manage the file and filename state. When the user selects a file, we set the file state and display the filename in the label element.
When the form is submitted, we create a new FormData object and append the selected file and Cloudinary upload preset to it. We then make a POST request to the Cloudinary API using the Axios library, passing in the form data as the request body.
Make sure to replace your_cloud_name with your own Cloudinary cloud name and YOUR_UPLOAD_PRESET_NAME by your own preset name.
To create an upload preset in Cloudinary navigate to the "Upload" section and click on the "Upload presets" tab. Click the "Add upload preset" button and configure the settings as per your requirements.
Delete image from cloudinary
In order to delete an existing image, you will need to provide a public ID and a signature. The public ID is a unique identifier for the image that can be obtained from the Cloudinary URL, while the signature is a security measure that ensures the request is authorized.
Retrieve the public ID from a Cloudinary URL
To programmatically retrieve the public ID from a Cloudinary URL, you can use a regular expression to extract the public ID from the URL. Here's an example code snippet that demonstrates how to retrieve the public ID from a Cloudinary URL:
To obtain the public ID, we can utilize the following regex pattern:
const regex = /\/v\d+\/([^/]+)\.\w{3,4}$/;
const cloudinaryUrl = 'https://res.cloudinary.com/your_cloud_name/image/upload/v1234567890/public_id.jpg';

const getPublicIdFromUrl = (url) => {

  const match = url.match(regex);
  return match ? match[1] : null;
};

const publicId = getPublicIdFromUrl(cloudinaryUrl);
console.log(publicId);
Generate a signature using your Cloudinary account's secret API key and the image URL parameters
Cloudinary allows you to add a signature to your image URLs to ensure that the requests are authentic and secure. A signature is a unique string that is generated using a combination of your Cloudinary account's secret API key and the parameters of the image URL.
The signature can be generated using the HMAC-SHA1 algorithm
import crypto from "crypto";
const generateSHA1 =(data: any) => {
const hash = crypto.createHash("sha1");
hash.update(data);
return hash.digest("hex");
}
const generateSignature = (publicId: string, apiSecret: string) => {
const timestamp = new Date().getTime();
return `public_id=${publicId}×tamp=${timestamp}${apiSecret}`;
};
Delete an image from Cloudinary API using the public ID
To delete an image from Cloudinary API using the public ID of the image to be deleted in Next.js using Axios, you can use the Cloudinary API's Delete resources endpoint. Here's an example code snippet that demonstrates how to delete an image:
import axios from 'axios';

const handleDeleteImage = async (publicId) => {
  const cloudName = 'your_cloud_name';
  const timestamp = new Date().getTime();
  const apiKey = 'your_api_key';
  const apiSecret = 'your_api_secret'
  const signature = generateSHA1(generateSignature(publicId, apiSecret));
  const url = `https://api.cloudinary.com/v1_1/${cloudName}/image/destroy`;

  try {
    const response = await axios.post(url, {
      public_id: publicId,
      signature: signature,
      api_key: apiKey,
      timestamp: timestamp,
    });

    console.error(response);

  } catch (error) {
    console.error(error);
  }
};
Note that in order to use this code, you'll need to replace your_cloud_name, your_api_key, and your_api_secret with your actual Cloudinary cloud name, API key, and API secret, respectively.
In summary, Cloudinary provides a comprehensive solution for managing, uploading, and removing images from web applications. With its advanced image optimization, manipulation, and delivery tools, Cloudinary makes it easy for developers to efficiently manage visual content at scale. By leveraging Cloudinary's intuitive user interface and automation tools, developers can streamline their workflow and save time. Overall, Cloudinary is a valuable asset for developers who are looking to optimize and manage visual content effectively.
Don't forget to stay in touch, We can't wait to hear from you!
More articles
Ismail Ghallou
2018-10-07
Implement i18n to a Gatsby site.
In this article, we will implement i18n to a Gatsby site using react-intl and react context API step by step.
8 min read
Jose López
2020-11-08
Setting up a Cloudflare Argo Tunnel on AWS Fargate.
A complete guide to set up a Cloudflare Argo Tunnel on AWS Fargate.


