
In this article we will cover the main concepts behind dockerizing an application. We will also illustrate steps to deploy and run the application in a development environment.
What is Docker?
Docker is a tool designed to facilitate the creation, deployment and execution of applications using containers. Containers allow a developer to package up an application with all of the parts it needs -such as libraries and other dependencies- and ship it all out as one package. By doing so, thanks to the container, we can rest assured that the application will run on any other machine.
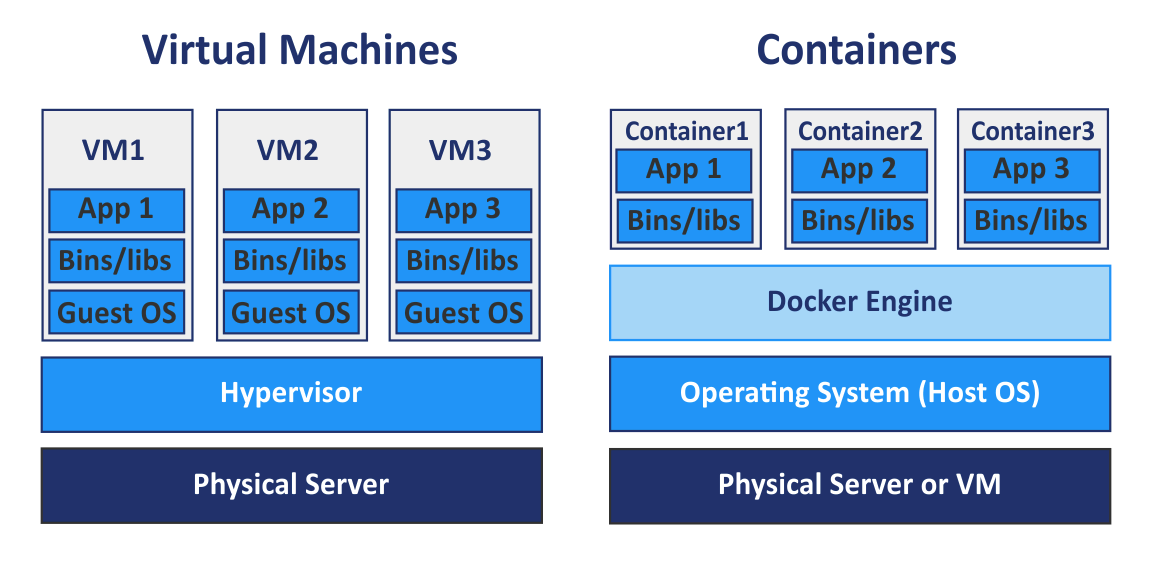
In a way, Docker is a bit like a virtual machine. But unlike a virtual machine, rather than creating a whole virtual operating system, Docker allows applications to use the same Linux kernel as the system that they're running on and only requires applications be shipped with things not already running on the host computer. This gives a significant performance boost and reduces the size of the application.
There are numerous alternatives to Docker that also rely on the principle of containers but, in this article, we will exclusively cover the one that is most widely used in the software world i.e Docker.
Setup Docker
After installing docker from https://docs.docker.com/install/, we give Docker instructions on how we would like our application to run as a container. We do so in a special file called: Dockerfile
Create a docker image
In the root directory of our project we create the Dockerfile. A Dockerfile looks like this:
FROM python:3.8.2-slim-buster

ENV PYTHONUNBUFFERED 1

RUN mkdir -p /opt/app

WORKDIR /opt/app

RUN apk --update add --no-cache bash curl-dev python3-dev  \
                      libressl-dev gcc libgcc curl musl-dev \
                      make libpq postgresql-dev mariadb-dev

RUN pip install -U pip setuptools

COPY requirements.txt .

RUN pip install -r requirements.txt

ADD . .

EXPOSE 8000
Here is the explanation of the file line by line:
FROM python:3.8.2-slim-buster
In this example we are using a lightweight linux distribution container which has Python 3.8 already installed.
All docker python images are available in a docker hub at: https://hub.docker.com/_/python
ENV PYTHONUNBUFFERED 1
We can create all sort of Environment Variables using Env.
RUN mkdir -p /opt/app
Running a command inside the container, here we create the folder where we will put our application.
WORKDIR /opt/app
The WORKDIR command is used to define the working directory of a Docker container at any given time.
RUN apk --update add --no-cache bash curl-dev python3-dev  \
                      libressl-dev gcc libgcc curl musl-dev \
                      make libpq postgresql-dev mariadb-dev
In this line we run the command apk add proper to Linux alpine distribution which installs OS dependencies.
RUN pip install -U pip setuptools
We install the latest version of pip and setuptools.
COPY requirements.txt .
We copy the requirements file to the working directory.
RUN pip install -r requirements.txt
We install our Django application requirements.
ADD . .
We copy our Django application into the working directory.
EXPOSE 8000
Expose command informs Docker that the container listens on the network ports 8000 at runtime.
What is Docker Compose?
As we all know modern applications need more than one service to work properly, we need for example a database, a cache and message broker, an asynchronous task queue, etc.
In order for all of those services to work we need Docker-compose which is a tool for defining and running multi-container Docker applications. With Compose, we use a YAML file to configure our application’s services. Then, with a single command, we create and start all the services from our configuration.
Create docker-compose file
In the root directory of our project we create the yml file
A docker-compose.yml file looks like this:
version: "3.3"
services:
  app:
    build:
      context: .
    restart: on-failure
    ports:
      - "8000:8000"
    volumes:
      - .:/opt/app
    command: >
      bash -c "python manage.py runserver 0.0.0.0:8000"
    env_file:
      - docker-compose.env
    depends_on:
      - pgsql

  pgsql:
    image: pgsql:latest
    environment:
      - POSTGRES_USER=root
      - POSTGRES_PASSWORD=root
      - POSTGRES_DB=pgsqldb
In this example we create two services, an app service and a pgsql service. In order for the app to know which DB engine it should connect to, we have to setup this configuration in settings.py in our Django project.
DATABASES = {
    'default': {
        'ENGINE': 'django.db.backends.postgresql',
        'NAME': 'pgsql',
        'USER': 'root',
        'PASSWORD': 'root',
        'HOST': 'db',
        'PORT': '5432',
        }
    }
build:
    context: .
Build the service image from the existing dockerfile.
restart: on-failure
Configures if and how to restart containers when they exit.
ports:
    -"8000:8000"
Used for mapping ports (HOST:CONTAINER).
volumes:
    - .:/opt/app
Mount host paths or named volumes, to a service. When we are writing a file on a project file this file is being written on your container as well and vice versa.
command: >
    bash -c "python manage.py runserver 0.0.0.0:8000"
Runs this command when the container is running.
env_file:
    - docker-compose.env
Here we can specify the path to a file where we store all Environment variables that we want to be available in the container.
depends_on:
    - pgsql
Express dependency between services, means that our app service will wait for pgsql container to run before running.
pgsql:
    image: pgsql:latest
Specify the image to start the container from. Can either be a repository/tag or a partial image ID(available in hub.docker.com)
After we create our files, we can now run our dockerized application with the following commands:
#docker-compose build
In order to build the containers.
#docker-compose up
In order to run the services.
Before we run the application, we will need to run our migrations and load our static data. There are many ways doing it, but here we will explain the easiest one(in my opinion):
In the root directory we create an entry point file with:
#!/bin/sh
set -e

python manage.py migrate --no-input
python manage.py collectstatic --no-input

exec "$@"
And we add run this file in the Dockerfile after expose command:
EXPOSE 8000

ENTRYPOINT ["sh", "/opt/app/entrypoint.sh"]
Conclusion
In this article, we provided a simple, quick tutorial on how to dockerize a Django application. We first configured our container image in a Dockerfile, then we specified the services needed for our Django webapp to run within a docker-compose.yml, and finally we used docker-compose commands to build and start our service containers.